Under Sink Boiling Billy
Undersink TD Series Installation & Maintenance
Installation & Maintenance:
Boiling Billy Undersink TD series.
This undersink BOILING BILLY dispenses BOILING water – Please treat with care.
Do not use the undersink BOILING BILLY for washing hands.
Important: Do not regulate water flow with the tap. Have your plumber install a pressure limiting vale if pressure exceeds manufacturers recommendations (350Kpa).
For areas with pressure above 350 Kpa, an authorised 350 Kpa only pressure limiting valve must be fitted for maximum efficiency.
*Maximum inlet pressure 350 Kpa
*Minimum inlet pressure 250 Kpa
This unit is fitted with a computerised element and boil dry protection. The computer is set at 97°, altitude will alter temperature (refer to manufacturer).
Warning:A backflow prevention device complying with the requirement of A.S. 3500 I is required to be installed on the water supply inlet to this unit.
DO NOT SWITCH ON POWER WITHOUT WATER RUNNING OUT FROM THE TAP.
-
If fitted with filter we recommend changing the cartridge every 6 months
-
The manufacture recommends the cleaning and service of the unit every 12 months
-
IF SUPPLIED CORD IS DAMAGED IT MUST BE REPLACED BY AN AUTHORISED SERVICE AGENT (ELECTRICIAN).
INSTALLATION INSTRUCTIONS
Action to be performed by a qualified person.
Model TD Series Undersink
Do not plug in or turn on power
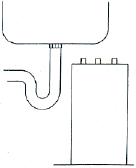
| 1. Position heater unit underneath the sink as close as possible to its outlet tap.
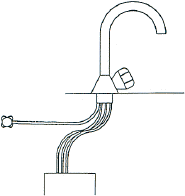
3. OBSERVING THE ATTACHED LABELS
|
4. All pipes and tubes must not be extended and must have a continuous fall between tap and heater. 5. OPEN TAP UNTIL WATER IS FLOWING FROM THE SPOUT. 6. Plug unit into power point and switch on. |

Before using we recommend the fitting of a water filter.
Only Teflon tape to be used where necessary.
Under no circumstances is plumber’s paste to be used.
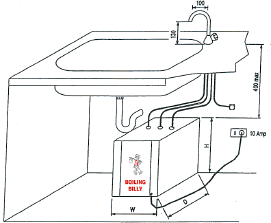
TYPICAL INSTALLATION
N.B. When fitting this unit in a cupboard of small proportions, please note that the unit does omit heat.
If in doubt fit cross flow vents.
DO NOT connect to hot water line – to do so will void warranty.
AFTER POWER IS ON – allow 30 minutes before using.
TROUBLE SHOOTING
Action to be performed by a qualified person.
Undersink TD Series
| SYMPTOM | CAUSES | ACTION |
| No Water
|
Water supply turned off | Check mains supply |
| Blocked filter | ||
| Water not hot
|
Faulty element | Replace element |
| No power supply | Check and test power supply | |
| Water overflowing from tap spout
|
Expansion Chamber full | Run tap for 5-10 minutes |
| Low inlet pressure | Contact Manufacturer | |
| Excessive steam from tap | Faulty element | Replace element |